Take control of Ads at home - throw them in the Pi-Hole
Adverts seem to be embedded on every page on the internet these days and to be honest it’s spoiling the browsing experience. The good news is that you can use your Raspberry Pi to fight back with an awesome bit of software called PiHole.


Adverts seem to be embedded on every page on the internet these days (apart from this one) and to be honest, it’s spoiling the browsing experience, with pop-ups and banners in the middle of text. Also, the amount of bandwidth some of these adverts take up is staggering and can slow down your internet speed, plus there’s the tracking of your browsing habits that makes them a privacy nightmare! The good news is that you can use your Raspberry Pi to fight back with an awesome bit of software called PiHole.
Setup
Now, there’s a few stages to get this going but I‘ll walk you through them to get it running and blocking sites, and then we’ll look at securing your DNS further, with software called Unbound.
First, make sure you have Raspberry Pi OS Lite installed as we won’t need a Desktop interface for this. When using the Raspberry Pi Imager I recommend setting the host name as pihole.local so it’s easy to access on your network.
Set a static IP address
You’ll need a static IP so all the computers on your network know where to go to look up DNS entries. Raspbian Buster static IP is set a little bit differently from how it was done in Raspbian Jessie. We now use the /etc/dhcpcd.conf file to configure a static address rather than the old interface file. You’ll need to SSH into your Pi using the host name pihole.local
ssh pi@pihole.localTo set the Pi's static IP, use your favourite text editor and open up /etc/dhcpcd.conf. I would use vi but nano is also an option.
sudo vi /etc/dhcp.confScroll down until you see the line static "ip_address=" and uncomment that line by removing the # at the beginning. Now edit the line with the IP and interface you want to set, remember eth0 for ethernet and wlan0 for WiFi. This example assumes your network is in the 192.168.0.0/24 range, which is pretty common, but check your settings.
interface eth0
static ip_address=192.168.0.200/24
static routers=192.168.0.1
static domain_name_servers=192.168.0.1
Now save your config and reboot. Once the Pi is up and running again it should be assigned to the static IP. Look out for IP clashes on your networking - don't give it an address that other systems are using. It's a good idea to set it to an address that your router doesn't give out with DHCP.
Install PiHole
To install the software it’s really straight forward and the script below will install all the parts you need. You’ll need to SSH into your Pi again and copy and paste the script below.
curl -sSL https://install.pi-hole.net | bashOnce installed it should prompt you to set the web admin password. If you lose this or forget it, you can connect via SSH and run this in your terminal:
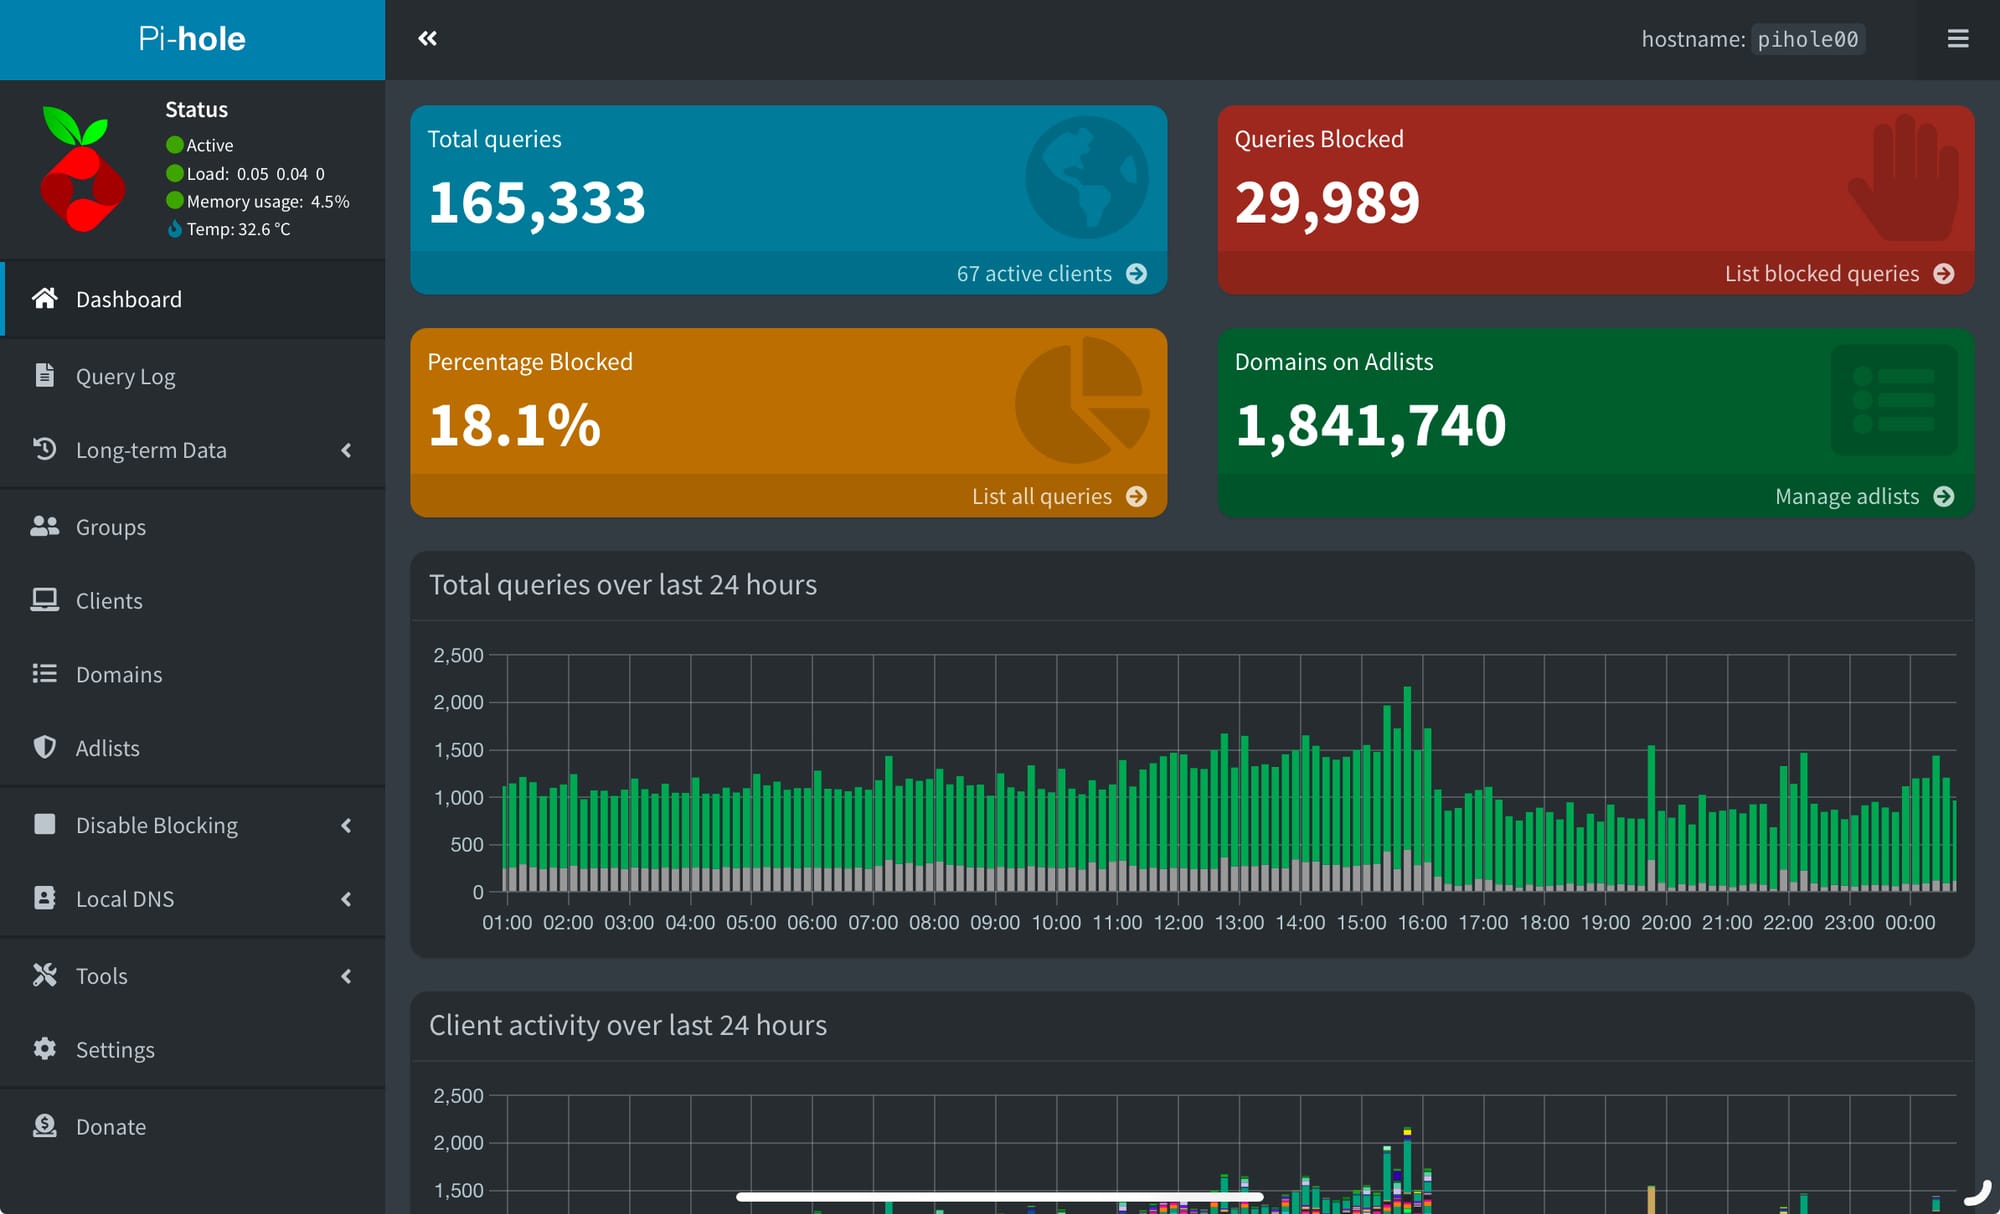
pihole -a -pWhen you then open your web browser of choice just go to the address https://pihole.local/admin, and if that doesn’t resolve, try using the static IP you assigned. You should see an interface like the one below.
Add some adlists
Everything is now working and you’ll be able to browse to
https://pihole.local/admin
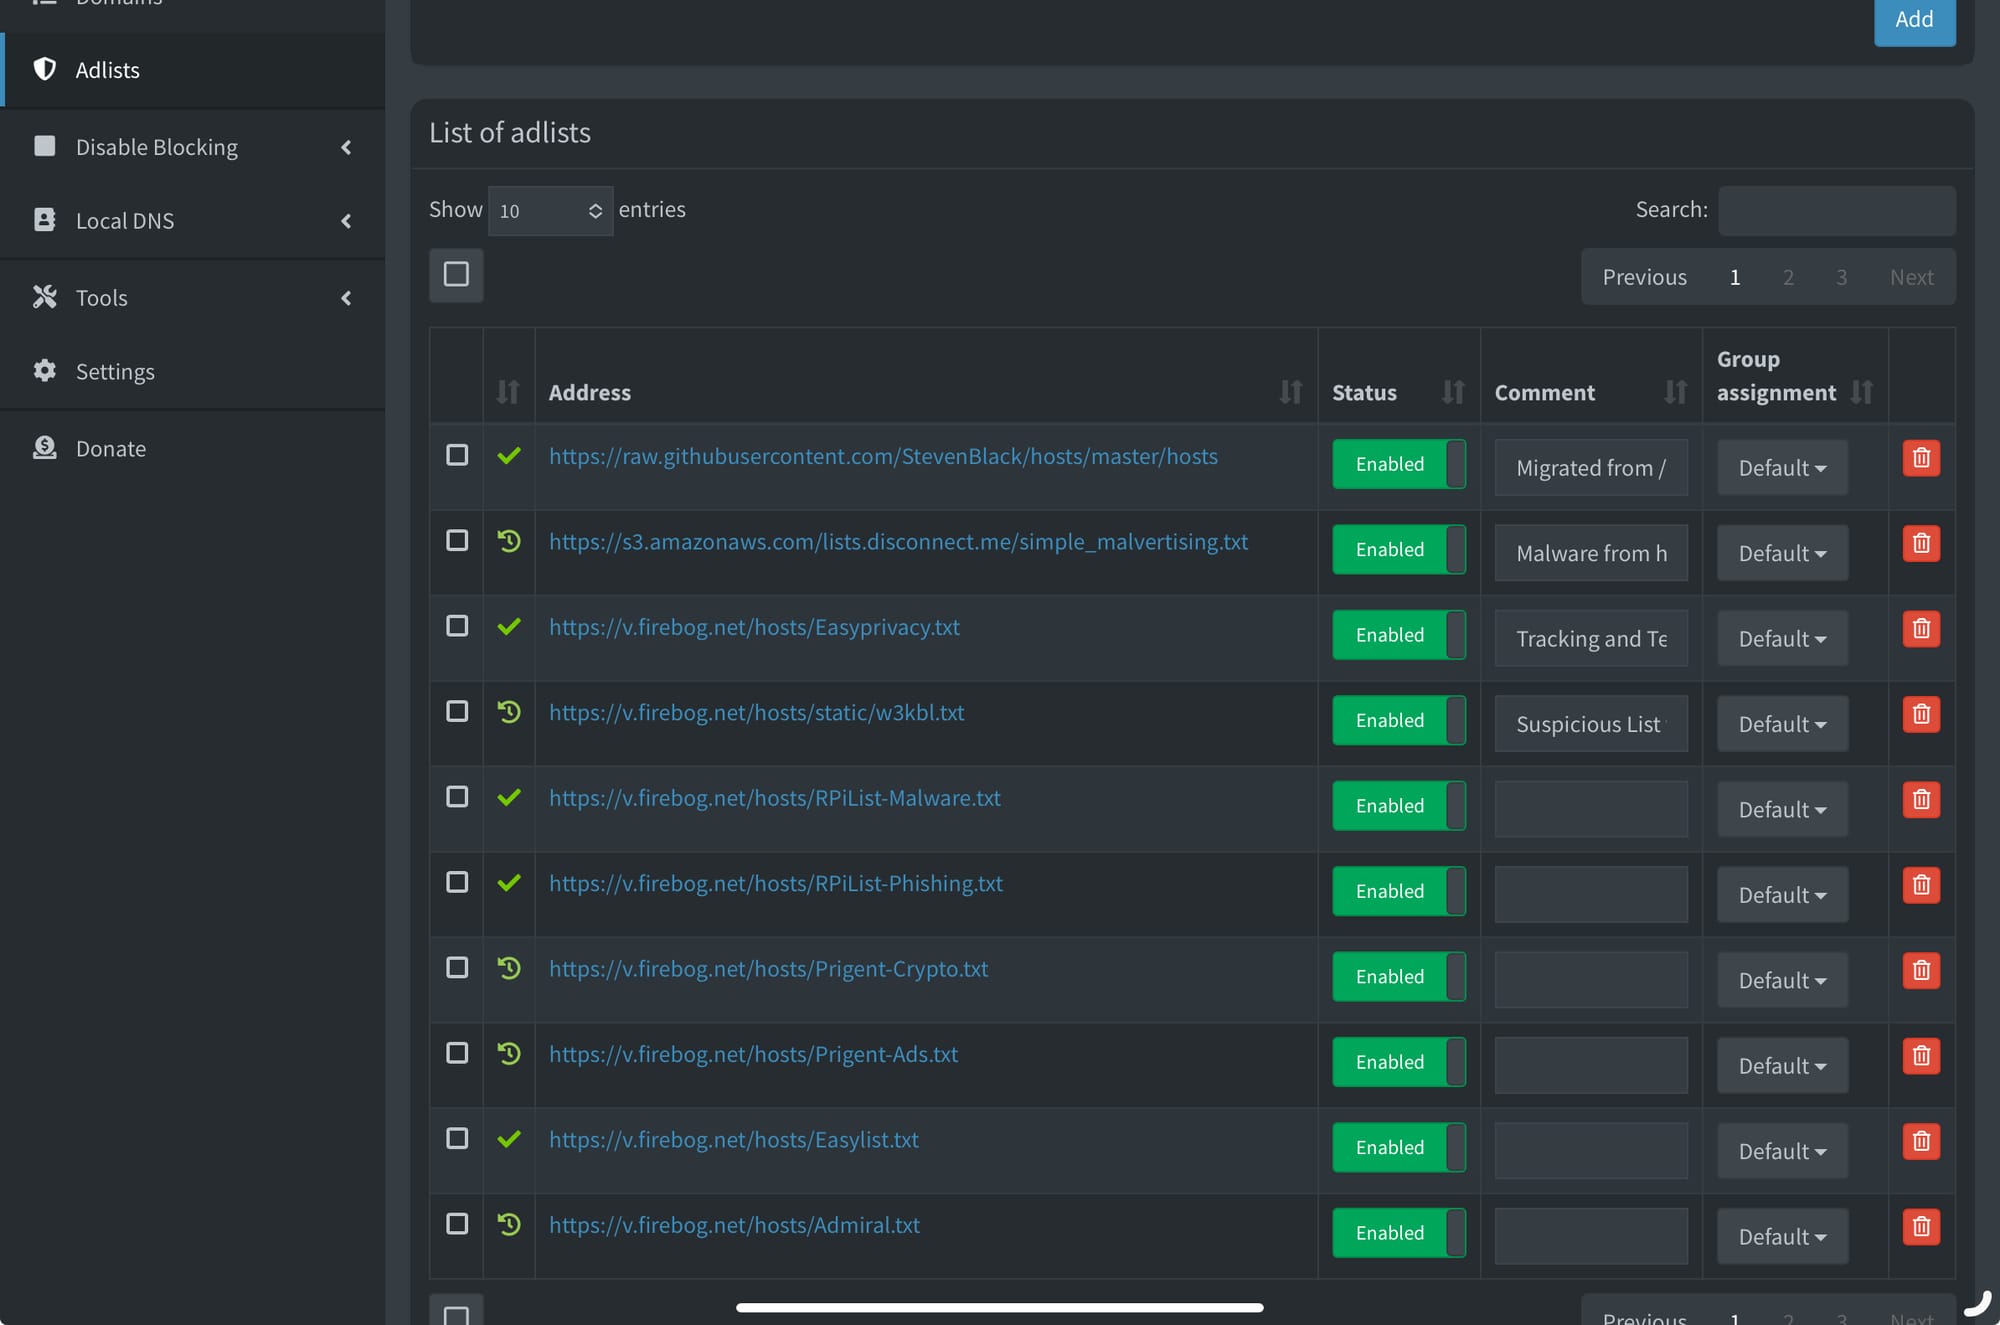
here you should see a section for ad lists which allows you to add pre-made lists of hosts to block (these will stop adverts from being resolved by your computer and thus stop them loading). This is the bit where you can add select lists depending on your needs and many people provide lists for malware, graphic content, tracking adds, etc. One that’s handy to use is
https://github.com/r0xd4n3t/pihole-adblock-lists?tab=readme-ov-file
which will set up a lot of default lists for you.
Secure your DNS requests by using your own resolver
In its current state, PiHole will work, but we want to take things up a notch. At the moment we are using either your ISP’s DNS resolvers or Google’s or Cloudflare’s, basically whatever your router has as default. If you really want to keep your DNS queries private, you need to run your own resolver on the Pi, this way you only query the root servers on the internet and your ISP or those other companies can’t profile you on your requests. The setup of this will definitely make your browsing more private, so let’s give it a go.
SSH into your Pi as we are going to need to install some new packages. Once you’re logged in run the following command:
sudo apt install unboundThis will install the dns server that’s going to resolve all your queries. Now we need to edit a few files to get everything set up. You can use vim or nano for this - open up the file /etc/unbound/unbound.conf.d/pi-hole.conf
sudo vi /etc/unbound/unbound.conf.d/pi-hole.confNow enter the details from below and then save the file.
server:
    # If no logfile is specified, syslog is used
    # logfile: "/var/log/unbound/unbound.log"
    verbosity: 0

    interface: 127.0.0.1
    port: 5335
    do-ip4: yes
    do-udp: yes
    do-tcp: yes

    # May be set to yes if you have IPv6 connectivity
    do-ip6: no

    # You want to leave this to no unless you have *native* IPv6. With 6to4 and
    # Terredo tunnels your web browser should favor IPv4 for the same reasons
    prefer-ip6: no

    # Use this only when you downloaded the list of primary root servers!
    # If you use the default dns-root-data package, unbound will find it automatically
    #root-hints: "/var/lib/unbound/root.hints"

    # Trust glue only if it is within the server's authority
    harden-glue: yes

    # Require DNSSEC data for trust-anchored zones, if such data is absent, the zone becomes BOGUS
    harden-dnssec-stripped: yes

    # Don't use Capitalization randomization as it known to cause DNSSEC issues sometimes
    # see https://discourse.pi-hole.net/t/unbound-stubby-or-dnscrypt-proxy/9378 for further details
    use-caps-for-id: no

    # Reduce EDNS reassembly buffer size.
    # IP fragmentation is unreliable on the Internet today, and can cause
    # transmission failures when large DNS messages are sent via UDP. Even
    # when fragmentation does work, it may not be secure; it is theoretically
    # possible to spoof parts of a fragmented DNS message, without easy
    # detection at the receiving end. Recently, there was an excellent study
    # >>> Defragmenting DNS - Determining the optimal maximum UDP response size for DNS <<<
    # by Axel Koolhaas, and Tjeerd Slokker (https://indico.dns-oarc.net/event/36/contributions/776/)
    # in collaboration with NLnet Labs explored DNS using real world data from the
    # the RIPE Atlas probes and the researchers suggested different values for
    # IPv4 and IPv6 and in different scenarios. They advise that servers should
    # be configured to limit DNS messages sent over UDP to a size that will not
    # trigger fragmentation on typical network links. DNS servers can switch
    # from UDP to TCP when a DNS response is too big to fit in this limited
    # buffer size. This value has also been suggested in DNS Flag Day 2020.
    edns-buffer-size: 1232

    # Perform prefetching of close to expired message cache entries
    # This only applies to domains that have been frequently queried
    prefetch: yes

    # One thread should be sufficient, can be increased on beefy machines. In reality for most users running on small networks or on a single machine, it should be unnecessary to seek performance enhancement by increasing num-threads above 1.
    num-threads: 1

    # Ensure kernel buffer is large enough to not lose messages in traffic spikes
    so-rcvbuf: 1m

    # Ensure privacy of local IP ranges
    private-address: 192.168.0.0/16
    private-address: 169.254.0.0/16
    private-address: 172.16.0.0/12
    private-address: 10.0.0.0/8
    private-address: fd00::/8
    private-address: fe80::/10
Now let’s test if everything works. The first time you try and resolve using the dig command it may take a while. Don’t worry - it will speed up after this.
sudo service unbound restart
dig pi-hole.net @127.0.0.1 -p 5335
Now let’s edit the /etc/dnsmasq.d/99-edns.conf file and add:
edns-packet-max=1232This tells FTL to adhere to the edns buffer size that we set up in the first file. You can test this is working by running the following commands:
dig fail01.dnssec.works @127.0.0.1 -p 5335
dig dnssec.works @127.0.0.1 -p 5335
The last thing to do is now log into the admin console again via your browser:
http://pihole.local/admin
Browse to Settings and the DNS tab and Add 127.0.0.1#5335 to the Upstream DNS Servers and make sure all the others are disabled (unticked). Now you’re done and ready to roll.
Update your router settings
In order to get all your computers, phones and tablets to use this as their default DNS server, you need to log into your router. These all differ depending on your ISP but the section you are looking for is DNS (some routers have this setting under DHCP also) where you should be able to change the settings from automatic to manual. Here you’ll need to enter your static IP that you set up earlier. Once done, refresh your connection on your browsing device and you should be using the new DNS server. You can check this in network settings and advanced, which will show you which DNS servers you have configured.
Your browsing is now much much cleaner from adverts, the odd few will get through but you can try updating your block lists or adding new ones. You’ll also have the opportunity to whitelist things you want to allow. For example I had to add a bunch of things to my white list to allow BBC iPlayer to work. Check out the PiHole forums and someone will be able to help you with this.
Conclusion
PiHole is one of the best uses for your Raspberry Pi and will really change your browsing experience on the web for the better. You’ll get cleaner looking websites and better privacy in general. I highly recommend installing this and if you want to take it to the next level you can install a second PiHole server for backup and run something like gravity-sync to keep everything aligned in regards your white and black lists.
It’s not the easiest install but I really think it’ll improve your browsing experience.
Pro’s
- Removes all those adverts and popups, which makes for a much better browsing experience
- Reduce network traffic and save on bandwidth
- Keep your DNS requests private and prevent your ISP snooping
Con’s
- Setting your own resolver up requires a bit more than running the install script
- Some websites detect you are blocking adverts and deliberately penalise you (👀 at you, YouTube)
- Adding extra features like gravity sync normally requires scripting knowledge
PiSource Score
| Easy of Setup | Features | Ease of Use | Extendability | Total |
|---|---|---|---|---|
| 6 | 9 | 8 | 6 | 29/40 |